Manage your lists from anywhere with Salesforce and Pardot

Add to Pardot Lists and Add to Engagement Studio Lists are now available as standard buttons to add to record and list view pages in Salesforce. The buttons allow you to add prospects to Pardot lists without leaving their CRM. Adding prospects to an Engagement Studio list also adds them to related engagement programs, if applicable.
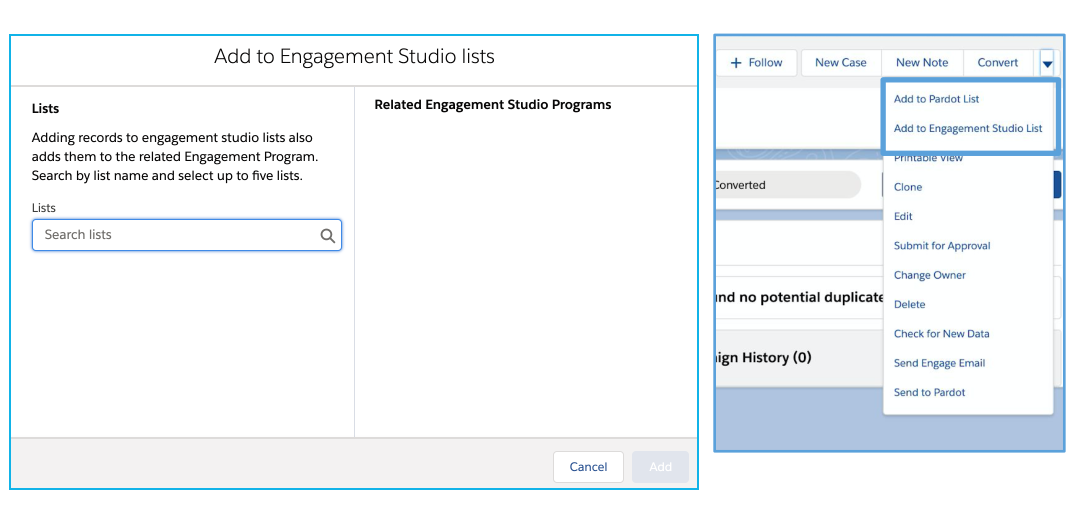
Things to remember

  • All lists must be Static and made CRM Visible
  • Up to 5 lists may be selected at once
  • Up to 200 records at a time may be added via a list view button
  • Records are not immediately synced despite Success banner displayed. Will take several minutes to sync new records to Pardot and add to list

View and access engagement data on opportunities

With Engagement History dashboards now available you can now visualise marketing influence on an opportunity from before the opportunity was created, during, and after it was closed. This will enable your Sales and Marketing Teams to better understand campaign engagement across the sales cycle. You can:

  • See activity counts, details about the activities’ associated campaigns, and a list of recent activity by related contacts. You will be able to:
  • Use Contact Role filters to zoom in on activities or other identified contacts
  • Filter by the campaign and activity

Did you know you can connect Pardot Forms to a Communities Page?

Salesforce Communities is a powerful way to share information and collaborate with people who are key to your business processes, such as customers, partners, or employees. Salesforce Communities allows you to use easy point-and-click branding tools with ever-evolving Lightning templates or go with Visualforce to create branded collaboration spaces.

To take your engagement further you can also use both Pardot Tracking and Pardot Forms to engage with your partners or customers on Community Cloud. Perhaps you want to target customers who haven’t viewed their profile page and drop them in an Engagement Program to update their profile or you want to drive your community users to download your latest guide.

Here are the steps to add the Pardot tracking code to your community:
1. In Salesforce, create a new Salesforce Campaign for your Community and get the Tracking Code from the Connected Campaign.

2. In Community Cloud Experience Builder, go to Settings | Security.
Under Content Security Policy, choose Allow Inline Scripts and Script Access to Whitelisted Third-party Hosts.

3. Then go to Settings | Advanced.
Under Head Markup, click “Edit Head Markup” and paste the Community Campaign Tracking Code.


4. Finally, go back to Settings | Security and under CSP Errors click on “Whitelist URL” for any Pardot blocked resource.


5. Any activity data will then show within the Campaign as well as particular Prospects.

And follow these three simple steps to embed a Pardot Form on a Community page:
  1. In order to do this, the first action is to add your tracker domain used in Pardot as a CSP trusted site. See screenshot below.

2. Then add the “HTML Editor” component into your Community page builder and copy/paste the iFrame HTML code available within Pardot.
3. You will need to delete ” allowTransparency=”true” “ from that iFrame code.

Thinking about how to do this for your business?

Please remember, all Salesforce implementations are unique and this represents general advice. Should you have any problems with this please reach out to Resonant Cloud.

Contributor: Stephane With, Senior Marketing Specialist, Salesforce

Stephane joined Salesforce in January 2019 as a Solution Engineer after 8 years as a client and then as a Salesforce Consulting Partner.

He is on the forefront of Salesforce’s digital engagement solutions encompassing the entire Marketing Cloud suite (including Pardot, Datorama, Social, Advertising, Interaction and Audience Studios) and working with non-profit and education customers.

Connect with Stephane on LinkedIn.